
Here's Eduard's recent 1:48 kit of the Clerget-powered Sopwith Camel. It's one of a series of kits covering the various versions of the famous First World War fighter, done to the latest standards. In other words, they're excellent, and I'm sure they're the best kits of the Camel in 1:48 scale, and will be for a long time to come.
I made this as a companion for the Fokker Dr.I I made earlier, for someone who fancied a pair like this. My friend was specific about getting the Red Baron's Triplane, but simply wanted any RFC or RAF Camel to go with it, ie. it didn't have to be Brown's Camel, which used to be given the credit for Richthofen's demise (we know now it was downed by fire from Australian troops). This let me go for William Barker's Camel, which I've often thought of doing. Why this? Because it has some claim to being the most famous Camel of them all, being flown by Barker while he shot down no less than 46 of his total of 50 official victories.
Barker himself is celebrated as one of Canada's great aces. He was a rare winner of a VC, won in a solo engagement with a pack of Fokker D.VIIs at the end of the war. He possibly accounted for 4 of them, but was terribly injured, which may have contributed to his death in a flying accident a few years afterwards. He'd given up B6313 before that famous battle, but most unusually he had taken it with him from Italy to the Western Front, and via several squadrons. Though a type like the Camel was mass produced, the flying qualities of these early wooden aircraft could vary considerably, and Barker must have felt he'd struck lucky with B6313.
So, why did I 'get the hump' with Eduard's wonderful Camel kit? Let me say, I've enjoyed building it, I've been impressed with Eduard's research and the detail they've provided, and except for the problem which I as the modeller can't unsee, I'm pleased with how it looks now. These pictures are taken with an eye to hide the issue; I just couldn't bring myself to demonstrate it, sorry.
Here's the thing. The Sopwith Camel was designed with an aim to improve on the already impressive and successful Sopwith Triplane, firstly with an airframe which could cope with two machine guns rather than one (the Triplane's performance suffered with the extra weight); and secondly, with a simpler construction conducive to easier manufacture and maintenance. One sensible decision was to fit a straight flat top wing; but that entailed designing extra dihedral in the bottom wings. From the model maker's point of view, they'd want to get this right, because that amount of dihedral could easily trick the modeler's eye, and disaster follows. Eduard's solution was to mould two spars into each lower wing, set at the right angle. If you look at the bottom part of the fuselage section in the construction shots below, under the pilot's seat, you can roughly see the channels where the spars are going to go.

The snag with this is that those channels are formed in the building process, ie. while you're building the cockpit. There are plenty of built up pieces to put together here, and it's maybe too easy to end up with a tiny bit of misalignment, and thanks to that heavy dihedral you may not notice until too late that the bottom wings don't stick out perfectly 90 from the fuselage. And I didn't notice. In fact I didn't appreciate it until I was already rigging it, and unable to retrace my steps because of my rigging method. Sometimes you just have to be philosophical and study Zen or something.
But I honestly enjoyed the rest of the long time I took over the cockpit area. Eduard provide lots of alternative parts, allowing for different styles and standards, for instance you can opt to paint the instrument panel, use a decal, or, as I did, use the very nice pre-printed one. There's plenty of PE in the kit, but you don't have to use it, and I often didn't. Inevitably, having so much to pack into this area, well it's fun, and they do make it as practicable as possible, but you'll still be clenching somewhat, when it comes to sticking the fuselage together. Furthermore, on top of all the stuff which it's near impossible to see when it's finished, I elected to fit the control lines from the joystick and the rudder bar. Ridiculous really, but there you go. In fact there should be more than you see here, but half a dozen worked for me. You can see them in the right hand picture, and also see the extra slab of plastic I stuck in the rear fuselage to anchor them.

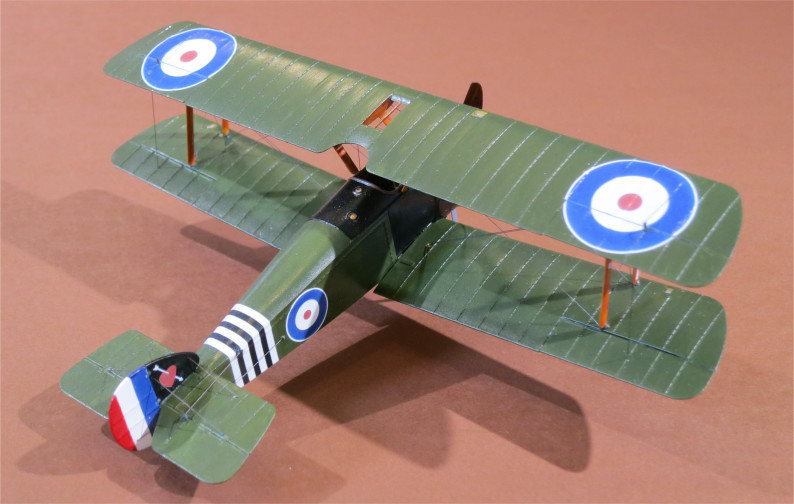
In truth, the cockpit opening in the Camel is quite tight, and right under the trailing edge of the top wing, so you're not going to see much. It took a little effort for the photo above, to get an angle which showed the instrument panel. What does stand out, when you contemplate the Camel, is the 'acorn' or adjuster which pulled the rigging between the front cabane struts away from the Vickers guns. Unfortunately, in my case, because of the afore mentioned wing alignment issue, causing the piece to contact the windscreen. Too bad. I have to take the attitude that it'd look worse if it wasn't there. You can see what I'm talking about in the top picture.
You can also see in that picture a strange red item on one of the guns. It's tiny in this scale, but essential to include in a kit of Barker's B6313. While in Italy, he replaced the normal gunsight with this, a devil thumbing his nose at the enemy.
I hope I've acknowledged that the difficulties I had with this kit were my own fault and avoidable. Otherwise, I've found these new Eduard kits (see also my previous build of Richthofen's Fokker Dr.I) eye opening as regards their quality, and it's almost a pity that I'm committed to other scales. If things change and I have another to build, I'm sure I'll enjoy it.

Superb attention to detail and historical background. Makes good reading!
ReplyDeleteMany thanks Colin! Despite my slip up with the wing, I'm pleased with the overall result and it really was a great kit to build. I can't imagine we'll see a better one in this scale.
Delete